Hardwood Floors: A Complete Guide
Whether you’re laying a wood floor in a new house or replacing one that’s damaged beyond repair, there are dozens of species to pick from, including trusty domestics, such as oak and maple, and intriguing exotics, such as tamarind and acacia. You also have a choice of widths—be it rustic wide planks or traditional narrow strips—and stain colors, which allows you to tailor your floors to your house’s style and decor.
And thanks to modern adhesives, a wide variety of species are available as “engineered” boards. Made from a stable sandwich of veneers, rather than solid stock, engineered floors can go places where it wasn’t practical to install wood before: over radiant-floor heating systems and concrete and in basements.
How much do hardwood floors cost?
Costs are between $1.50 to $8 per square foot depending on wood thickness, species, and grade. Some prefinished solid-wood and engineered wood floors are DIY-friendly, but if you plan to hire a pro installer, tack on $2 per square foot, minimum.
How many years do they last?
Some prefinished solid-wood boards come with a 50-year warranty. With regular care, though, any solid-wood floor can easily last twice that long. Warranties on the finish for engineered wood range from 10 to 30 years.
How do you maintain them?
Fight a finish’s biggest enemy—abrasive dirt—by vacuuming regularly and laying runners and doormats near entries.
Tips for Installing Solid Hardwood Flooring
Advice for Installing Solid Hardwood Flooring
Updating a home’s flooring is one of the best ways to increase its value. Even though design trends are always changing, you can never go wrong with a solid hardwood floor. Fortunately, installing solid hardwood flooring isn’t a difficult job as long as you have the right tools, knowledge and patience.
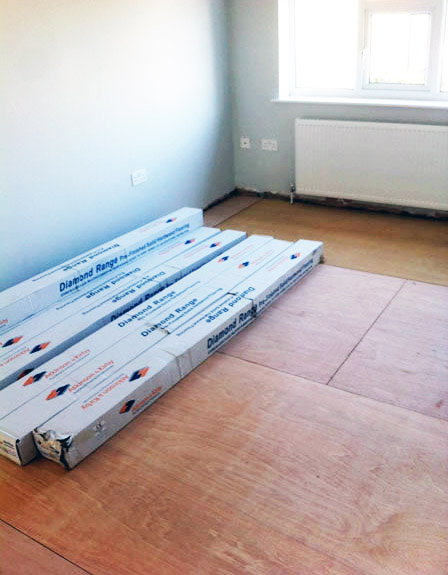
I want to give you seven tips for installing solid hardwood flooring I’ve learned over the years so you can complete a quick and professional hardwood installation. An important note on solid hardwoods: make sure you leave the wood inside the home with the boxes open for at least a few weeks prior to installing solid hardwood flooring. It’s important that the wood acclimatizes to the environment to prevent cupping or shrinkage after installing the hardwood flooring. I used an inexpensive moisture meter to test the moisture content of my hardwood to ensure it was within 1% of the rating of my subfloor.
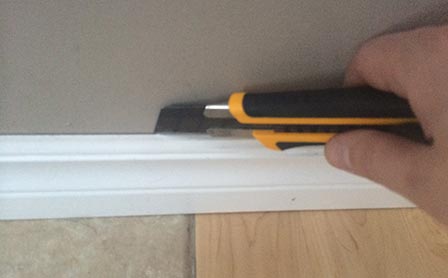
Removing the Baseboard
The baseboard should be removed before installing solid hardwood flooring. Some might recommend undercutting the base, but it’s a time intensive exercise and you lose height on your baseboard. Installing new hardwood flooring is a good time to consider replacing or upgrading your baseboard as part of the project. Score the top edge of a base with a utility knife to make sure you remove the old base cleanly. Then use a small trim pry bar to pull the baseboard away from the wall. Set the baseboard to the site if you plan on using it again, or discard it if you’re replacing it after the installing the solid hardwood floor
Preparing the Subfloor
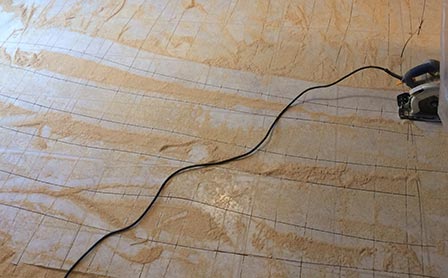
You might not think so, but preparing the subfloor can take as much or more time than the actually installing solid hardwood flooring – it all depends on the current floor material. If you’re replacing carpet, simply pull up the carpet at one of the corners with a pair of pliers and remove the underlayment and tack strips. I’d recommend saving some of the carpet if it’s also used in other areas of your house. It’s often impossible to find matching carpet after a few years, plus the carpet you’re removing will already have a similar wear pattern to what’s used elsewhere in your home.
You should cut the subfloor in small squares to score the vinyl and underlayment. The underlayment is usually attached with staples and adhesive so you need to wear eye and hearing protection. It’s also best to use a dull blade because a new blade will definitely be dull once you’re finished. After the surface is scored you have to chip the surface. You can use a simple hammer and pry bar if the underlayment is poorly installing, but if the previous contractor used lots of adhesive and staples you need more powerful tools. I prefer to use a rotary or demolition hammer in chipping mode with a chipping blade or chisel. My Bosch worked well for this job.
tips for Installing Wood Flooring
Choose your wooden floor carefully
There are many different types of hardwood flooring so make sure you choose the correct one for you. Hardwood flooring comes in a variety of different grain patterns, species of wood, plank sizes and surface finishes. All of these will be important to you as you will want the floor to fit in perfectly with your space. It is important that you also think about whether you want solid hardwood or engineered hardwood. Depending on how you want to lay the floor may make this decision for you. If you have underfloor heating or want to float your floor over an underlay then you will need to select an engineered hardwood. Sometimes the subfloor will also determine the type or thickness of the flooring. For example, if you have joists, you wooden flooring must be at least 18mm thick. Why not have a look at Fitting wood flooring onto different subfloors for further information.
Acclimatise your wood floor
As soon as your hardwood flooring has been delivered to your property, it is important to let it acclimatise sufficiently. Acclimatising means to allow the flooring to adapt to its new surroundings. Hardwood is a natural product and will inevitably expand and contract with changes in heat and humidity. By letting you hardwood flooring acclimatising to your home, you are reducing the risk of damage to the wood once installed
Here are some simple steps to follow to make sure you acclimatise your floor properly:
Make sure your floor is delivered in plenty of time before the installation starts.
Put the hardwood flooring, still in its packaging, in the room where it is going to be installed.
The room should be thoroughly dry. The hardwood should not be left on a damp floor or in an area with wet plaster on the walls.
Make sure you do not leave the wooden flooring directly next to a heater or radiator.
Leave solid wood flooring to acclimatise for at least 7 days.
Leave engineered wood flooring to acclimatise for at least 72 hours.
Prepare your subfloor ready for installation
It is really important that you properly prepare your subfloor before installation. If it has not been done correctly, it can cause your flooring to become damaged. The most important things to check are whether your subfloor is flat, level, clean and dry.
Use a spirit level to ensure that your subfloor is flat and level. If it is not then you will need to either line your subfloor with plywood (for a wooden subfloor), or use a self-levelling compound (for a concrete subfloor).
Check the Moisture Content (MC) of your subfloor using a Moisture Meter. A wooden subfloor should be 16%MC or below. A concrete subfloor should be below 6%MC. If your subfloor is not dry enough you should allow it more time to dry out naturally.
Your subfloor needs to be clean. Remove any old chemicals or adhesives that may still stuck to the subfloor and then sweep away dust and dirt
Simple Steps to Keep Your Hardwood Floors Looking Good!
I have been a disobedient daughter. 🙁 My parents moved into a new house several weeks ago, and my Mom asked me for advice about how to clean and care for her new wood floors. Apparently she has been getting conflicting advice on how best to clean them. Well, while I don’t have personal experience with cleaning wood floors, I have spent a good amount of time now researching it and have been surprised to find out it’s actually VERY SIMPLE. So this is for you Mom….better late than never? 🙂
Take your shoes off!
When you walk on a wooden floor with dirty shoes, you are leaving lots of sand and dirt behind. These abrasive particles can ruin your wood floors. Position mats both outside and inside exterior doors to lessen tracked-in dirt. In snowy or rainy weather, include a boot removal area to avoid damage from water and de-icers.
Vacuum or dust mop dirt and grime away before you wash
Rubbing dirt into your floors is never a good idea. Dust the floor with a mop that has been treated with a dusting agent (or use a microfiber duster) to pick up dust, dirt, and pet hair.
For occasional deep cleaning (dirt, oil and grime will build up over time), the best solution for cleaning wood floors is one cup of vinegar mixed with one gallon of water. Immerse a clean mop into the solution and wring it until it is damp-dry. Mop the floor in the direction of the floorboards, so if the water dries with a bit of a streak in it, it will not be as visible. After mopping, use a soft, clean towel to dry it or let it air dry.
If you want to get a little creative….steep 1 bag of tea in 2 cups of boiling water and leave until it comes to room temperature. Remove tea bag and soak cloth in liquid, wring out then wipe floor clean. Dry with a soft cloth. The tannic acid in the tea will help bring wood to a shine.
Ultimate Guide to Hardwood Flooring
As you may know, there almost always are pros and cons to taking on a do-it-yourself (DIY) project. The positive side of a DIY effort is usually the cost. For home improvement projects, labor is often the single largest expense.
Installing a hardwood floor yourself would eliminate this cost. Besides cost, there are other factors to consider:
Can you get a professional look on your own?
How much time will it take to install hardwood floors?
How much money will you save if you do it yourself?
There have been huge advancements in the construction of hardwood floors. These technological advances have made many types of hardwood floors easier to install. In fact, most hardwood floor suppliers can work with customers to find out just how much work they really want to do on their own. For instance, you can order wood floors that are pre-finished — so there is no need to finish or seal the floor before or after installation. In fact, factory-finished floors can be installed straight out of the box. Because of these types of advancements, it is easier than ever to install a hardwood floor yourself.
Obviously, hiring a professional to install your floors will take a lot less time than doing it on your own. And, you’re pretty much guaranteed excellent results. The professionals do it every day, after all. Remember, the real benefit will not be in regard to time saved or execution, but the money you could save.
If you consider that hiring a professional to install your floors could cost upward of several thousand dollars, doing it yourself may be worth the extra time. When installing your own floors, you only have to pay the cost of materials and tools or tool rental. Because you’re not paying for the quality and craftsmanship of specialized labor, these costs are considerably less than what you would pay for professional installation. All in all, if you think you’re up to the task, handy, and fancy yourself a wannabe Bob Vila or Vern Yip, this project is for you.